The SD card on one of my Raspberry Pi systems filled up recently, so I decided to wipe it and reinstall Raspbian. The main Rasbian distribution, however, is designed to help teach kids to code and includes lots of tools that I generally don’t use, so I decided to build it from scratch.
The Raspberry Pi Foundation provides a light version of the Raspbian OS, which is intended for Pis used as servers or in embedded devices. Raspbian Jessie Lite doesn’t include a graphical interface by default, nor does it include any of the various browsers, office tools, or programming tools that you’d normally expect to see on a Pi. It’s pretty much just the basic OS and the standard utilities you’ll to find on any Linux machine.
To get started, download the latest Raspbian Jessie Lite image and use your method of choice to install it on your SD card. Since I’m working form a Mac, I usually use IvanX’s Pi Filler. Once the card is built, stick it in your Pi, boot up, and run raspi-config right away to set up your Pi and change your password.
sudo raspi-config
Since this is an advanced tutorial, I’ll assume you’re already familiar with raspi-config, so I won’t spend time on it here. If you need help, there are plenty of tutorials online.
Now, I’ve never been a fan of the Raspberry Pi’s desktop environment, LXDE. I just don’t really like how it looks and it’s difficult to customize. PIXEL, the new implementation of LXDE on new versions of Raspbian is a little better looking, but I still can’t get into it. Instead, I much prefer XFCE, another lightweight desktop environment. Unlike LXDE, you can configure XFCE up the ying-yang, making things look exactly the way you want.
We first need to install the XWindow system, which is the low-level software that allows graphical desktops. Since we don’t want to accidentally install any of the default PIXEL libraries, however, we’ll use the -—no-install-recommends option with apt-get:
sudo apt-get install -—no-install-recommends xserver-xorg
sudo apt-get install -—no-install-recommends xinit
Next we’ll install XFCE, the XFCE terminal application, and the LightDM display manager:
sudo apt-get install xfce4 xfce4-terminal lightdm
This will install a ton of dependencies, and will take a while to complete.
At this point you could run startx and have a working system, but it would be extremely basic, so we’ll also add a bunch of XFCE utilities. These let you add desktop features like status bar icons and desktop widgets that help make the interface more user friendly:
sudo apt-get install xfce4-goodies xfce4-indicator-plugin xfce4-limelight-plugin xfce4-mpc-plugin xfce4-whiskermenu-plugin
Now lets start the graphical environment:
startx
The first time you run XFCE, you’ll see a screen that looks something like this:
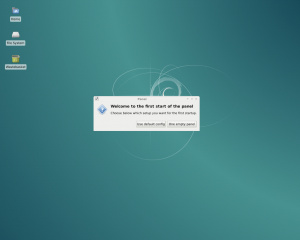
The first time start XFCE, you’ll be prompted to set up your desktop.
XFCE can be configured in a lot of different ways, and everyone has their own preference. Personally, I prefer something that looks kind of like an older Windows system with a bar at the bottom of the screen featuring an application menu, buttons to indicate running programs, and some status indicators, quick access menus, and the like. I’ll take you through my personal preferred setup in the next few steps, but feel free to customize things to your liking.
First, click the “One empty panel” button in the dialog box. A small white box will appear near the top of the screen.
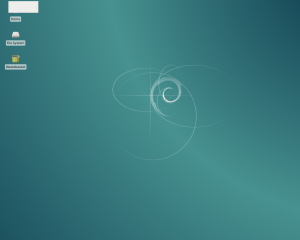
The first panel will initially appear near the top of the screen.
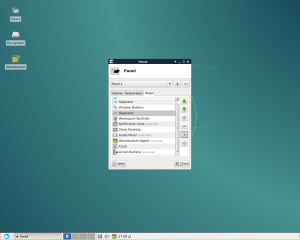
Drag the box to the bottom left corner of the screen. Right click on this box and choose “Panel preferences…”
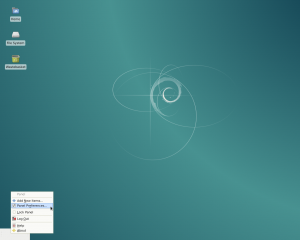
Right click on the panel and select Panel Preferences.
On the “Display” tab of the Panel dialog, set the mode to “Horizontal,” the row size to 32 pixels, number of rows to one, and the length to 100%.
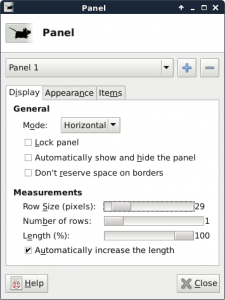
Sample settings for the panel.
Next, click on the “Items” tab. The click the “+” button to start adding items to the panel. Below is the list of items I use on my panel, in order from left to right:
* Whisker Menu (an application launcher similar to the “Start” menu in Windows)
* Separator
* Window Buttons
* Separator
* Workspace Switcher (lets you quickly change between virtual desktops)
* Notification Area (a place for applications to show status indicators; for example, a email app might indicate when you have new messages)
* Show Desktop (minimize all windows)
* Audio Mixer (control the speaker volume)
* Wastebasket Applet (quick access to your system’s trash)
* Clock
* Action Buttons (this give you quick access to functions like lock screen, logout, and reboot)
Feel free to add other options that make sense for your system. For example, if you’re using WiFi, you might want to add the Wavelan item to help you manage your wireless network connections. When you’re done, your screen should look something like this:
The newly customized panel.
Most of the panel items have a set of preferences that go along with them which you can access by selecting the item you want to configure and clicking the properties button. It probably looks like a wrench on top of a sheet of paper and is located just below the “-“ button.
You can explore the settings on your own, but to help make things look a little cleaner, choose the second separator and click the properties button. Then check the “Expand” checkbox and click “Close.” That pushes the items after the separator up against the right side of the screen and makes the panel look more balanced.
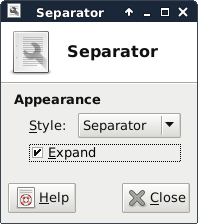
Expanding the separator helps balance the look of the screen.
Now close the Panel dialog. We’ve got our desktop set up, but it still looks a little blah. Let’s do something about that.
Use the newly added Whisker Menu to run the Terminal Emulator, which should be at the top of the list.

running the terminal emulator from the Whisker Menu.
We’ll now add some additional desktop themes (which set the style and color of system elements like window borders, buttons, and the like), icons, and background images. We’ll start with the themes. At the moment, I’m really liking the MurrinaBlue theme that’s part of the Murrine theme package:
sudo apt-get install gtk2-engines-murrine
And, although I’m not a big fan of PIXEL, I really do like its background images:
sudo apt-get install pixel-wallpaper
Finally, we’ll install the Elementary icon set. ElementaryOS is a lesser-known Linux distribution, but it has one of the nicest, most professional looking sets of icons I’ve seen—and they work well with XFCE.
While some Linux distributions have an XFCE-Elementary icon package available, Raspbian does not, so we’ll simply clone it from GitHub.
First install git:
sudo apt-get install git
Then run these commands:
sudo mkdir /usr/local/share/icons
cd /usr/local/share/icons
sudo git clone https://github.com/elementary/icons.git elementary
Now open the Whisker Menu, type “appearance,” and open the “Appearance (Customize the look of your desktop)” applet that appears.
On the Appearance dialog’s “Style” tab, you’ll see a long list of desktop themes. As you select them, your screen will change to show you a preview. As I noted earlier, my go-to theme is currently MurrinaBlue.
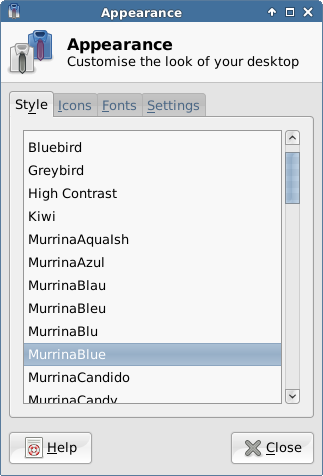
Selecting a theme for the desktop
Next, click on the Icons tab. Again, as you click through the various options, you’ll see the desktop change. Choose “elementary” (not “elementary Xubuntu dark”).
Selecting an Icon Set
Now close the Appearance dialog, right-click on the desktop, and select “Desktop Settings.”
Right click on the desktop and select Desktop Settings,
You’ll see that XFCE already comes with several wallpaper images, but we want to use the PIXEL images, so click the “+” button:
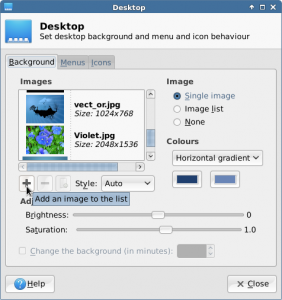
Click the “+” icon to add additional wallpaper imeages.
In the “Add Image File(s)” dialog, click in the whitespace of the file listing (middle box) and start typing /usr/share/pixel-wallpaper and then press enter.
Click on the first image (aurora.jpg), then scroll to the bottom of the list, hold down Shift, and click on the last image (waterfall.jpg) to select the entire set of images. Then click add. Now select your wallpaper and close the Desktop dialog.
Selecting all of the PIXEL wallpaper images will make them available in the XFCE Desktop Properties window.
Now that we’ve gotten everything set up, you’ll probably want to open a terminal window and run raspi-config again.
sudo raspi-config
Go to “Boot Options,” and “Desktop / CLI,” and chose to boot to “Desktop” instead of the default, command-line interface. Reboot when prompted.
Now you’ve got a basic system, but it doesn’t do much. You need some software. You’ll probably want a web browser or two:
sudo apt-get install firefox-esr chromium-browser
Maybe an office suite (I’m also including the LibreOffice SIFR icon set, as it’s much nicer looking than the default set):
sudo apt-get install libreoffice libreoffice-style-sifr
You’ll probably want a PDF viewer:
sudo apt-get install xpdf
And don’t forget an email client:
sudo apt-get install icedove
That should be enough to get you started. There is, of course, a ton of other software you can install, depending on your needs. Poke around on the Internet and you’ll be sure to find applications to do just about anything you want.
Extra Credit
When you rebooted after switching to the “Desktop” login, you probably noticed that the default Debian wallpaper appeared under the login dialog. Want to change that?
One a terminal window and type:
sudo vi /etc/lightdm/lightdm-gtk-greeter.conf
If you don’t like vi, feel free to use your preferred editor (such as nano), but if you’re going to be a Linux user understanding vi is a very useful skill that you should really take the time to learn. And don’t worry, I’ll clearly explain everything.
Press the / key (forward slash) to search the file and then type background (without the quotes, of course), followed by the n key (for “next match,” since the word background appears once before in the file), which will jump you to where the login screen’s wallpaper image is set.
Use the arrow keys to position the cursor on the first / after the equals sign and press the c key (for “change”), followed by the $ key (shift is required), which tells vi that you want to edit everything to the end of the line.
Now type the path to one of the PIXEL wallpaper images, such as
/usr/share/pixel-wallpaper/aurora.jpg
So that the entire line looks like this:
background=/usr/share/pixel-wallpaper/aurora.jpg
When you’re done typing, press the esc key and then type :wq (colon, w, q, which tells vi to write the file back to disk and then quit.
Now reboot the Pi again and you should see a much more welcoming login screen.
Extra Credit Part II
Now that you’re on your quest for software to install on your Pi, it might make sense for you to install a graphical package manager. Let’s face it, using apt-get to install packages or run updates is pretty easy, but using the command line to search for packages? Not so much.
The graphical package manager I generally prefer is called Synaptic. It’s pretty no-frills as far as the interface goes, but it’s easy to use and gets the job done. Like everything else, you can install Synaptic via apt-get:
sudo apt-get install synaptic
Synaptic will automatically add itself to the Whisker Menu (under “System,” but the default settings use an internal mechanism for prompting for the root user’s password to get the necessary privileges to install packages. By default, most Debian-based OSes, such as Raspberry don’t set a root password, so the menu item won’t work.
Fortunately, it’s easy to fix. First, you’ll need to install gksu, a package containing graphical equivalents to the su and sudo command-line programs:
sudo apt-get install gksu
Next we need to edit the synaptic.desktop file that creates the menu item. We can do this is one quick step:
sudo sed "s/synaptic-pkexec/gksudo synaptic/" /usr/local/share/applications/synaptic.desktop
This creates a new synaptic.desktop file in /usr/local/share/applications with an updated command in it. Without getting into the differences between /usr and /usr/local, the file in /usr/local will take precedence over the one in /usr, and we don’t have to worry about it getting overwritten when an updated package is released.
Now, when you select Synaptic from the Whisker Menu, you should get right in to the app without being prompted for an non-existing password.
Extra Credit Part III
Sometimes you may want to add your own items to your Whisker Menu. While it’s not too difficult to manually write the .desktop files yourself, there’s a much easier way: using a menu editor. One such menu editor that’s available for the Pi is called MenuLibre.
To install MenuLibre, run:
sudo apt-get install menulibre
MenuLibre will add itself as “Menu Editor” to the Accessories and Settings menus in Whisker Menu. Run it and you’ll have access to tweak any of your system’s menu items, or even add new ones.
The .desktop files that MenuLibre creates are stored in your own account and will only appear in your menu, not the menus of other users of the system (assuming you have any). If you want to share them, you should move the files from ~/.local/share/applications to /usr/local/share/applications:
sudo mv ~/.local/share/applications/myapp.desktop /usr/local/share/applicatons