OK, so you have a Raspberry Pi running heedlessly (no keyboard or screen) on your network and you want to do something with it. What do you do? Well, there’s SSH, of course, but what if you want to play with any of the Pi’s graphical tools?
The Raspbian OS (as well as most of the other general-use OS options available on the Raspberry Pi site) runs an XWindow service by default. This provides the GUI when the Pi is plugged in to a screen, but it can also be accessed remotely. This post will look at some of the several ways to do this.
TL;DR version: most of these examples are either too difficult to set up or too impractical to use reliably. For a no-nonsense tutorial on a tool that works pretty well, jump straight to the last section, XRDP.
X11 Forwarding
On Raspbian, the Pi’s SSH server has X11 forwarding turned on by default. This means that you can run GUI programs on your Pi, but display the interface on your local desktop, provided your local desktop has an X server itself. If you’re on Linux or some other form of graphical Unix, you’re good to go. Mac OS X users will need to install an X server, such as XQuartz. Then ssh into the Pi as you normally would, but add a -Y flag to enable local machine to receive the X11 data (replace the IP in the example with that of your Pi, of course):
ssh -Y pi@192.168.1.123
Once you log in, you’ll have a prompt that looks like any normal SSH session, but try running an XWindow program, like xeyes:
xeyes &
You should see a window open with two eyes it it that follow your mouse around the screen. Note the ampersand at the end of the command. This tells the Linux shell to move the xeyes process to the background, allowing the shell to return a prompt for the next thing you want to run. If you don’t include it, you’ll need to close xeyes before you can run something else.
Windows users don’t need to feel left out, either, as there’s a number of X server implementations for Windows, such as XMing, Cygwin/X, and XWin32 (commercial).
The advantage of X11 forwarding is that it’s already built in to the Raspbian OS and doesn’t require a lot of work to set up. The downsides are that you need to know the name of the programs you want to run, since you don’t have the GUI menu bar to select from and that it can be a little tricky to get working on the client desktop, especially if that machine runs Windows.
On the first point, however, you can launch the LXDE (Raspbian’s graphical environment) menu system by running:
lxsession &
This will open the Raspberry PI menu bar on your local screen so you can easily launch programs, but it won’t create a windowed version of the Pi desktop as you might expect, but instead becomes a weird mix of your local desktop and the remote desktop that’s confusing and difficult to use. Some X servers have an option to switch to a windowed mode, but if you want the windowed interface without a lot of fuss, you may want to consider another option, such as one of the ones below.
VNC
VNC, which stands for Virtual Network Computing, is a graphical desktop sharing protocol that was developed by a partnership with Olivetti, Oracle, and later AT&T in the late 1990’s. Since the code for the protocol was open sourced, many different clients and servers have been developed for nearly every platform you might encounter.
There are plenty of tutorials for getting VNC running on a Raspberry Pi, so I won’t spend time on that here. If you want to try it, this tutorial on the Raspberry Pi site will get you going.
You’ll also probably need to install a VNC client on your desktop—TightVNC seems to be one of the more popular choices, as are RealVNC (from the original developers of the protocol), UltraVNC (Windows only), and Chicken (formerly Chicken of the VNC, Mac only). Mac users take note: there’s already a VNC client built in to OS X—it’s called “Screen Sharing.app.” It’s buried pretty deep in the system, so you won’t find it in your Applications folder, but it should come up in a Spotlight search.
The problem with VNC is that its underlying Frame Buffer Protocol sends entire copies of the remote screen to the client, even if only a small portion of the screen has changed, which means it can feel extremely sluggish, even when doing simple tasks, like editing a document.
Chrome Remote Desktop
Chrome Remote Desktop is a remote access solution created by Google and available through the Chrome browser via Chrome Web Store. Rather than connecting directly, machines running the Chrome Remote Desktop service register themselves with Google’s servers when they start up, and Google serves as a proxy between the remote machine and the client accessing it, in a way similar to how instant messaging services work. This allows connecting over the Internet to remote computers that are sitting behind NAT firewalls, which is not possible with any of the other services listed here.
I use Chrome Remote Desktop regularly to access the Mac Pro in my office when I need to work remotely. The service uses SSL encryption to ensure privacy and Google’s VP8 video format to send the screen image, and it’s very responsive.
I have not tried Chrome Remote Desktop on a Raspberry Pi, but others have reported good luck with it on the older Raspbian Wheezy. Unfortunately, Chromium, Chrome’s open source cousin, is not available in the new Raspbian Jessie repositories (yet?), so short of building from source, this isn’t an option for me at the moment. Also, since it requires using Chromium to set it up, the Pi needs to be connected to something with a screen, at least initially (or you could configure it with X11 Forwarding).
NX
NX is a protocol developed by NoMachine, with client and server implementations for Linux, Mac, and Windows. Prior to version 4, NX was open source software that was tunneled to the client over SSH, so it was extremely easy to get running on a Linux box with very little fuss. Unlike VNC, however, NX uses compression to reduce the transferred data so that connections are responsive, even over slower networks.
NX has been my go-to tool for Linux remote access for years, but unfortunately no precompiled versions of it, or any of the open source forks or it, are readily available for the Raspberry Pi, and compiling it from source is tricky given the Pi’s limited resources.
XRDP
Fortunately I discovered XRDP some time ago. If you’re a Windows user, you might be familiar with the Windows Remote Desktop Protocol (RDP), which has been included as part of most Windows distributions since Windows XP. RDP achieves very fast speeds by sending only the portions of the screen that have changed to the client. Because of this, many programs appear almost as responsive remotely as they do when logged in to the machine directly.
XRDP is implemented as a hybrid between VNC and RDP. The actual remote control of the machine done in VNC, but data is sent back to the client through RDP, where it can benefit from the efficiencies of that protocol. This helps make XRDP faster than VNC, since much of the VNC overhead is never sent over the wire. RDP is also a widely supported protocol, with clients built in to most Windows computers.
To install XRDP, simply run the following commands on the pi:
sudo apt-get update

sudo apt-get install xrdp
Once XRDP is installed, you’ll want to make one small change to the configuration. By default, XRDP is configured with limited encryption, so someone could conceivably eavesdrop on your session. To fix this, open the xrdp.ini file on your Pi in your favorite editor (mine is vi (vim, actually), but feel free to substitute nano or something else if you’re not comfortable with vi):
sudo vi /etc/xrdp/xrdp.ini
In the general section of the file, find the line that starts with crypt_level and set it to high:
crypt_level=high
The crypt levels are defined as follows:
– low — Data you send to the server is encrypted with 40-bit RC4 encryption, but the data you receive is sent in the clear.
– medium — Data is sent in both directions using 40-bit RC4 encryption.
– high — Data is sent in both directions using 128-bit RC4 encryption
Once you’ve set the crypt_level, save the file and restart the service:
service xrdp restart
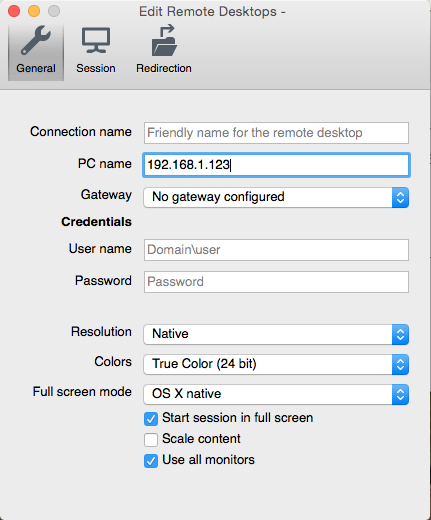
Then open your Remote Desktop Connection app (it’s in the Accessories folder of nearly every Windows machine, the official Microsoft version is a free download in the Mac App Store, and there are lots of third-party versions for Linux, iOS, and Android) and type in your Pi’s IP address:
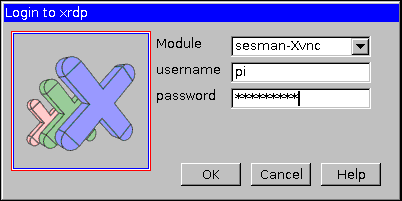
When you connect, you’ll be prompted for your credentials on the Pi. Leave the “module” set to “sesman-Xvnc,” enter your username and password, and click OK.
In a few seconds, you should have full access to your Raspberry Pi desktop.

You can use tools like R-HUB remote support servers, logmein etc. for remotely accessing computers from anywhere anytime. They work well.